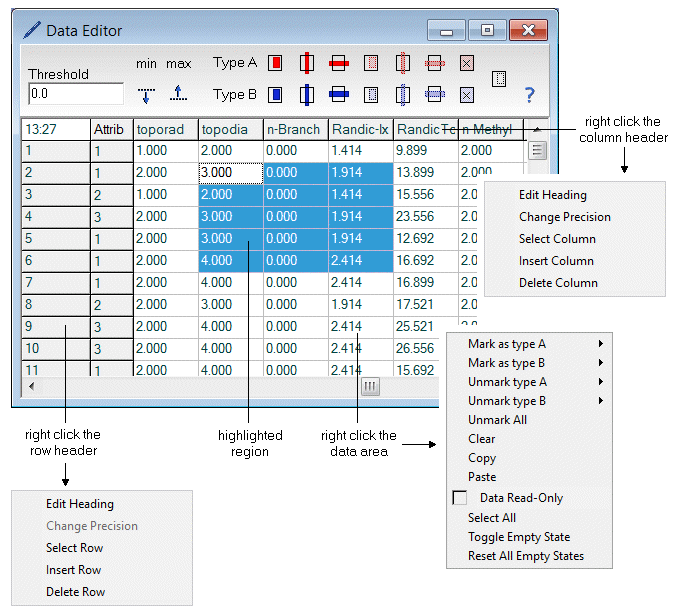
Context Menu of the Numeric Editor
The numeric data editor provides several commands for marking, unmarking, and copying by means of the context menu which is displayed when the right mouse button is clicked within the table boundaries. If appropriate, the commands in the popup menu are applied to the highlighted cells of the data table. In order to highlight a range of cells, you have to left click one of the corner cells of the intended range and drag the mouse over to the opposite corner cell keeping the left mouse button down. The highlighted cells are indicated by a blue background.

Context menu of the data area:
| Mark as Type A/B |
Marks the selected range, column, or row either by markings of type A, or B. The A markings are displayed in red, the B markings in blue. If some cells are marked with both types, the color is switched to magenta (as a mixture of red and blue). |
| Unmark Type A/B |
Unmark the selected range - either markings of type A or of type B |
| Unmark All |
Unmark all elements of the data matrix (both types of markings) |
| Clear |
Reset the highlighted cells to zero values |
| Copy |
Copy the highlighted cells into the Windows clipboard. The data is copied in exponential notation with a precision of 14 decimal places. |
| Paste |
Paste the contents of the Windows clipboard into the data table. |
| Data Read-Only |
You may protect data from changing it unintentionally by activating the read-only option. |
| Select All |
Selects all data of the data matrix. |
| Toggle Empty State |
Switches the visibility of the selected cells. Cells whose content is set invisible are not used for calculations. This way it is possible to deliberately exclude certain parts of the data matrix from calculations. |
| Reset All Empty States |
Reset the "Empty" state of all cells of the data table. After this command all cells are visible again. |
Context menu of row and column headings:
| Edit Heading |
After clicking this command a small text box is opened where you can enter the row or column heading. Press ENTER to finish the editing of the heading. |
| Change Precision |
Clicking this command cyclically changes the display precision of the data editor. Note: changing the display precision does not affect the internal precision of the data table. |
| Select Row/Column |
Highlights the entire row or column. |
| Insert Row/Column |
For rows: inserts a row above the row where you click the command. For columns: inserts a column left to the column where you click the command. |
| Delete Row/Column |
Deletes the corresponding row or column. |
|

 Features of DataLab
  Editing Data
  Data
Data  Context Menu of Numerical Editor


